")
What is JavaScript form validation?
Custom JavaScript form validation is the most important part of web development where you can display custom errors message to users and visitors of your website. We used JavaScript form validation to collect user's information and displaying custom error messages to users when they enter the wrong data into the form fields.
In the following section, we will take a closer look at how to perform JavaScript form validation.
Form Validation with JavaScript.
The custom form validation process consists of two parts
- Required field validation is performed to make sure that all the mandatory fields are filled.
- Data format validation is performed to ensure that the type and format of the data entered in the form is valid. Let’s start with step by step.
Steps
We need to follow the following steps below to create our web page.
Create a directory for custom javascript form Validation.
Example image for the directory

It is a good practice to create the required folder on your computer so you can proceed and manage it easily.
- Main folder with (JavaScript-validation) name.
- CSS folder for some custom styling and for adding the bootstrap.min.css library.
- Js folder for the JavaScript and bootstrap.min.js Library.
Once you have created the required folders it is time to create your HTML form structure by creating inputs fields.
- Launch your text editor and create a new file and save it as "index.html" in your (JavaScript-validation) folder.
- Create a new file and save it as "style.css" in your CSS folder.
- Create one more new file and save it as "javascript.js" in your js folder.
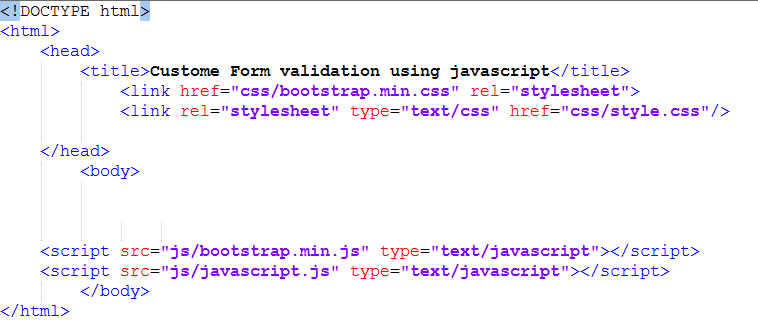
Write down the standard HTML5 tags in the "index.html" file by adding links of (bootstrap.min.css) library and (style.css) in the head section and scripts (javascript.js) and (bootstrap.min.js) library in body section before closing body tag.
Index.html Page looks like as shown below.
You can download the above bootstrap libraries that we use to make our form beautiful by clicking the below links. By clicking on the links you will be redirected to the new page. So copy all code and save them in their folders by creating the files and give a name to the file.
https://maxcdn.bootstrapcdn.com/bootstrap/4.1.1/css/bootstrap.min.css
https://maxcdn.bootstrapcdn.com/bootstrap/4.1.1/js/bootstrap.min.js
Now we are going to create a complete HTML form for custom JavaScript form validation using JavaScript functions.
<html>
	<head>
		<title>Custome Form validation using javascript</title>
			<link href="css/bootstrap.min.css" rel="stylesheet">
			<link rel="stylesheet" type="text/css" href="css/style.css"/>

	</head>
		<body>
			<div class="container">
				<h1>Custome Form validation using javascrip</h1>

					<form name="myForm" onsubmit="return validateForm()">
					<div class="form-group">
						<label>Your Name</label> <span id="error-name"></span>
						<input type="text" id="your-name" class="form-control" placeholder="Enter your Name">
					</div>
					<div class="form-group">
						<label>Your Email</label> <span id="error-email"></span>
						<input type="email" id="your-email" class="form-control" placeholder="Enter your Email">
					</div>
					<div class="form-group">
					<label>Select the Country</label><span id="error-country"></span>
				<select id="country1" class="form-control" onchange="country();" placeholder="Enter your Country Name">
						<option value=""></option>
						<option value="+92">Pak</option>
						<option value="+93">USA</option>
						<option value="+94">UK</option>
						<option value="96">Australia</option>
				</select>
				</div>
					<div class="form-group">
						<label>Your Phone</label> <span id="error-phone"></span>
						<input type="text" id="your-phone" class="form-control"  onchange="country2();"placeholder="Enter your Phone">
					</div>
					<div class="form-group">
						<label>Your Message</label> <span id="error-message"></span>
						<textarea id="your-message" class="form-control" rows="10" placeholder="Enter your Message"></textarea>
					</div>
					<div class="form-group">
						<input type="submit" class="btn btn-info" value="Submit"><span id="error-sub"></span>
					</div>

				</form>
			</div>

	<script src="js/bootstrap.min.js" type="text/javascript"></script>
	<script src="js/javascript.js" type="text/javascript"></script>
		</body>
</html>
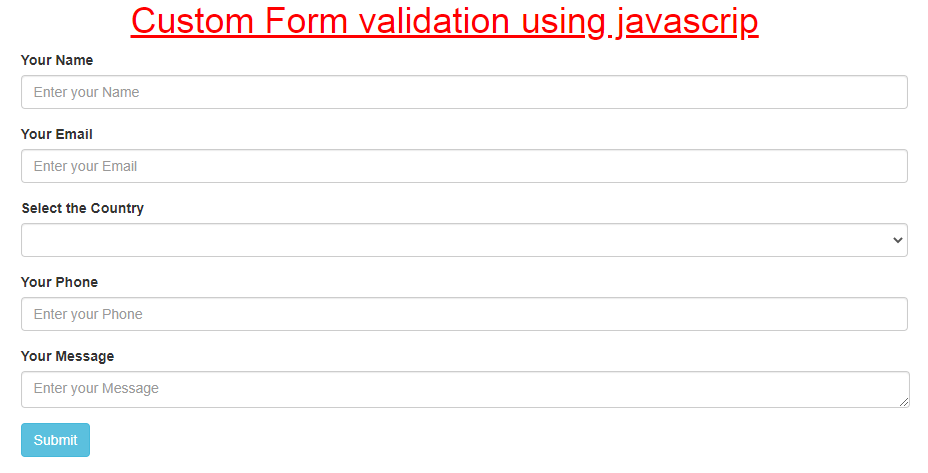
Here, we created a HTML form using bootstrap classes and added a JavaScript function to be initialized on the event of form submission. We also added an empty id beside the labels for each form field where we'll display the error message now your HTML form looks like as shown below.
JavaScript Form Validation Script.
Now open the "javascript.js" file that we create in our js folder and place the following code inside it, then save it. Go through each line of the following example code to understand how JavaScript validation works:
function validateForm(){
	var name = document.getElementById('your-name').value;
	var email = document.getElementById('your-email').value;
	var phone = document.getElementById('your-phone').value;
	var message = document.getElementById('your-message').value;
	var country = document.getElementById('country1').value;
	if (name.length<5) {
        document.getElementById('error-name').innerHTML = " Please Enter Your Name *"
    }
    if (email.length<1) {
        document.getElementById('error-email').innerHTML = " Please Enter Your Email *";
    }
    if (phone.length<1) {
        document.getElementById('error-phone').innerHTML = " Please Enter Your Phone *";
    }
    if (message.length<1) {
        document.getElementById('error-message').innerHTML = " Please Enter Your Message *";
    }
	if (country.length<1) {
        document.getElementById('error-country').innerHTML = " Please Select Your Country Name *";
    }
    if(name.length<1 || email.length<1 || phone.length<1 || message.length<1 || country.length<1){
		document.getElementById("error-sub").innerHTML="form submit unsuccesfuly";
       	return false;
    }
else{
	document.getElementById("error-sub").innerHTML="Form submit Succesfuly";

}
}
function country(){
	var val3=document.getElementById("country1").value;
	document.getElementById("your-phone").value=val3;
}
function country2(){
var code1=document.getElementById("country1").value;

}
Function “validate Form ()” which is programmed to initialize on form submission, we created an individual variable to store input values from each of the form fields. Then, we checked the string length of each of the values. If any of those form field values have no texts inside it, then, their respective error ids will display the defined texts inside it with the JavaScript pre-built function document.getElementById() To prevent the form from being submitted in case of any error, we used OR statement to return the user back to the same page without further processing of data at the end.
Add some Custom CSS to beautify the Form and Error messages.
Finally, open the “style.css" file that we have created in our CSS folder and place the following code in it, then save it.
h1{
	color:red;text-decoration:underline;margin-left: 260px;
	}

#error-name {
  color: red;
  margin-left: 5px;
}

#error-email {
  color: red;
  margin-left: 5px;
}
#error-phone {
  color: red;
  margin-left: 5px;
}
#error-message {
  color: red;
  margin-left: 5px;
}
#error-country{
  color: red;
  margin-left: 5px;
}
#error-sub{
  color: red;
  margin-left: 5px;
}
form{
	margin-left:100px;
}
Other Related Posts.
Custom Form validation using jquery
Form validation using a bootstrap validator
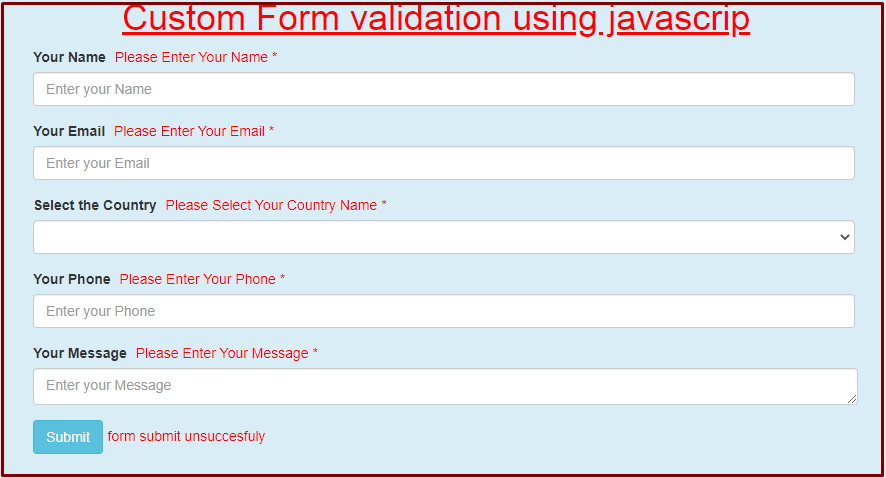
We have all done here is the final output of custom and easy javaScript form validation.
Final Output Image.
We hope you may learn how to apply custom JavaScript form validation using JavaScript. Please share your thoughts and queries in the contact section.
Below is the Download link of the above tutorial.
Click here to download full source code