
What are cookies and why we use it?
We are going to learn about PHP remember me feature with login form using cookie and session. As the name specifies the meaning that cookies are the method to store the small amount of information on a web page in a remote browser that can be used later for different purposes. It reduces the user effort by preventing to enter login details every time. A few days ago, we have learned PHP Login, Logout system using google recaptcha.
In this tutorial, I am going to show you how to add remember me feature and how to use cookie and session into your login form. Here we use the same login form and database that we already create in our last tutorial PHP Login, Logout system using google recaptcha after removing the google ReCaptcha from this tutorial. So let’s start.
To create Remember me feature Follow the below Steps.
STEPS
We need to follow the following steps below.
Create directory.
Example image for the directory.
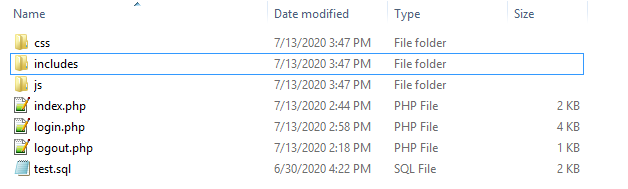
It is a good practice to create the required folders on your computer so you can proceed and manage it easily.
- CSS folder for custom styling and bootstrap library to make login form beautiful.
- Js folder for jQuery and bootstrap libraries.
- Includes folder has the database connection file with name conn.php.
- Test.sql file for importing the data into the database.
Once you have created the required folders it is time to create your HTML structure for the login form.
- Launch your text editor and create a new file and save it as "index.php" in your main folder.
- Create a new file and save it as "style.css" in your CSS folder.
- Create a new file and save it as "conn.php" in your includes folder.
- Create two more new files (login.php) and (logout.php) save that files in your main folder where you have to save the index.php file.
Create Database.
Open your phpMyAdmin and create a database with the name (test) and import a SQL file in it. You can download the SQL file from here. Click me to download SQL file
If you import the SQL file in the database then you need to use the below username and password into the login form.
Username: imtiaz
Password: imtiaz
Create a Database connection.
Open the conn.php file that you have save in includes folder and write a below code for database connection and save it.
<?php

$con=mysqli_connect("localhost","root","","test");

?>
Now we are going to create a Login form with remember me checkbox (in login.php page) using bootstrap libraries. If this checkbox is set then the login details entered by the user will be well-preserved for future login attempts.
<html lang="en">
<head>
<title>PHP Remember me in login form using cookie and session.</title>

    <meta charset="utf-8">
    <meta http-equiv="X-UA-Compatible" content="IE=edge">
    <meta name="viewport" content="width=device-width, initial-scale=1">
	<!--bootstrap library-->
<link href="css/bootstrap.min.css" rel="stylesheet" id="bootstrap-css">
<!--custom css-->
<link href='css/style.css' rel='stylesheet' type='text/css'>


</head>
<body>
    <div id="login">
        <h3 class="text-center text-white pt-5">Login form</h3>
        <div class="container">
            <div id="login-row" class="row justify-content-center align-items-center">
                <div id="login-column" class="col-md-6">
                    <div id="login-box" class="col-md-12">
					<!-- login form-->
                        <form id="login-form" class="form" action="" method="post">
                            <h3 class="text-center text-info">Login</h3>
							<?php echo $msg; ?>
                            <div class="form-group">
                                <label for="username" class="text-info" >Username:</label><br>
                                <input type="text" name="username" id="username"  class="form-control">
                            </div>
                            <div class="form-group">
                                <label for="password" class="text-info">Password:</label><br>
                                <input type="password" name="password" id="password"  class="form-control">
                            </div>

                            <div class="form-group">
								<label for="remember" class="text-info"><span>Remember me</span> </label><span><input name="remember" type="checkbox"> </span><br>
                                <input type="submit" name="submit" class="btn btn-info btn-md" value="LOGIN">
                            </div>
							<div id="register-link" class="text-right">
                                <a href="#" class="text-info">Register here</a>
                            </div>
                        </form>
                    </div>
                </div>
            </div>
        </div>
    </div>
	<!--bootstrap library-->
	<script src="js/bootstrap.min.js"></script>
	<!--jquery library-->
<script src="js/jquery.min.js"></script>
</body>
</html>
You can download the above bootstrap and jQuery libraries that we use to make a login form beautiful by clicking the below links. By clicking on the links you will be redirected to the new page. So copy all code and save them in their folders by creating the files and give a name to the file.
https://maxcdn.bootstrapcdn.com/bootstrap/4.1.1/css/bootstrap.min.css
https://maxcdn.bootstrapcdn.com/bootstrap/4.1.1/js/bootstrap.min.js
https://cdnjs.cloudflare.com/ajax/libs/jquery/3.2.1/jquery.min.js
Now we apply some custom CSS to beautify the login form you need to write the below code in your style.css file that you have save in your CSS folder.
body {
  margin: 0;
  padding: 0;
  background-color: #17a2b8;
  height: 100vh;
}
#login .container #login-row #login-column #login-box {
  margin-top: 0px;
  max-width: 600px;
  height: 465px;
  border: 1px solid #9C9C9C;
  background-color: #EAEAEA;
}
#login .container #login-row #login-column #login-box #login-form {
  padding: 20px;
}
#login .container #login-row #login-column #login-box #login-form #register-link {
  margin-top: -85px;
}
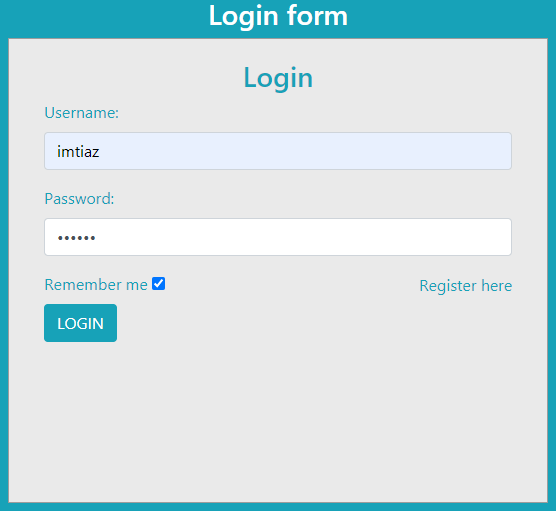
Your login form will look like as shown below.

Now we are going to write a PHP script on the same page (login.php) but before opening <html> tag. To understand the code please read the comments that we have to write with every line of this PHP script.for example (// start session // database connection).
<?php
session_start();//start session
include "includes/conn.php";//database connection
if(isset($_SESSION['adminId']) || (isset($_COOKIE['adminId']))){ //session  or cookie
	header("location:index.php"); //location redirection
}

else
{
$msg="";
if(isset($_POST['submit'])){ //for submission of form
	$username=mysqli_real_escape_string($con,$_POST['username']);//prevent sql injection
	$password=mysqli_real_escape_string($con,$_POST['password']);
		$query=mysqli_query($con,"select * from admin where username='$username'");//for running sql query
				if(mysqli_affected_rows($con)>0){
					$row=mysqli_fetch_array($query);//fetch data from admin table
					if(password_verify($password,$row['password'])){
						if(!empty($_POST["remember"]))
						{
							//time setting for cookie
							setcookie ("adminId",$row['id'],time()+ (10 * 365 * 24 * 60 * 60));
						}
						$_SESSION['adminId']=$row['id'];
						header("location:index.php");//for redirection

					}
					else{
							$msg= "<div class='alert alert-danger'>wrong password.</div>";//status msg

					}

				}
				else{
					$msg= "<div class='alert alert-danger'>wrong username</div>";

				}


		}
?>
Now open index.php page and write the below code in it. After successful login you will be redirected to this page.
<?php
session_start();//session strat
include "includes/conn.php";//databse connection
if(!isset($_SESSION['adminId']) && (!isset($_COOKIE['adminId']))){ //cookie and session
	header("location:login.php");//location redirection
}

else
{

?>
<html>
	<head>
		<title>Welcome</title>
		<link href="css/bootstrap.min.css" rel="stylesheet" id="bootstrap-css">
	</head>
	<style>
 body {
        background-image: url("css/images/bg-image.jpg");
        background-repeat: no-repeat;
        background-attachment: fixed;
        width: 100%;
        height: 100%;
        background-size: cover;
        background-color: #cccccc;
    }
h1 { background-color: aqua;
}
</style>
	<body>
		<h1>Welcome to uvisionpk.com Software and Web Development Company.</h1>
		<a href="logout.php" class="btn btn-success"><i class="fa fa-sign-out"></i> Logout</a>


		<!--bootstrap library-->
	<script src="js/bootstrap.min.js"></script>
	<!--jquery library-->
<script src="js/jquery.min.js"></script>
	</body>
</html>

<?php } ?>
Your index.php page looks like as shown below.

Now open you're (logout.php) and write the below PHP code in it for logout from the index.php page.
<?php
session_start();
unset($_SESSION['adminId']);//unset session
setcookie('adminId','',time() - (10 * 365 * 24 * 60 * 60)); //unset cookie
header("location:login.php"); //location redirect
?>
Now you can test this script by entering user detail along with remembering me checkbox or without remembering me checkbox. This is a very modest and cool PHP script to test PHP remember me Cookies and session with a Login form. You can simply download the script by clicking the link that we have given at the end of this tutorial and run on your computer as well.
Other Related Posts
PHP Login, Logout system using google recaptcha
DataTable Server Side Processing using PHP and MySQL
We have all done here is the final output.
Final Output Image.
We hope you may learn how to create a login, logout system with remember me using cookie and session. Please share your thoughts and queries in the contact section.
Below is the Download link of the above tutorial.