
What is PSD to HTML and CSS?
In general, PSD stands for Photoshop document PSD to HTML is actually a workflow. First website page (PSD) is designed throughout a Photoshop application and then converted into a webpage using HTML and CSS. After converting PSD to HTML you can open it in browser. You may edit snaps picture and create web pages designs (PSD) using Photoshop editor.
Web designers create their PSD designs in Photoshop editor first after making PSD they convert it into HTML format. If they have knowledge about HTML and CSS. Now we are going to learn HTML so.
What is HTML?
HTML stand for Hypertext Markup Language (HTML) HTML is the standard markup language for documents designed to be displayed in a web browser. If you have the knowledge about HTML and CSS you can convert your PSD file to HTML, There are various versions of HTML but you should make use of the latest version of HTML5. Now we have learn about CSS.
What is CSS?
CSS stands for Cascading Style Sheets.CSS describes how HTML elements are to be displayed. CSS is easy to learn and understand but it provides powerful control over the presentation of an HTML document. You can control the color of the text, the style of fonts, the spacing between paragraphs and content of the webpage. Now we are going to convert our PSD into HTML.
Convert PSD into HTML
You already have your design in the PSD format and knowledge about HTML and CSS then you can do it if you don’t have knowledge then first you need to learn about HTML and CSS because PSD to HTML conversion is a time-consuming process. Therefore, careful planning is required to avoid wasting of time.
Getting Started
First we understand different parts of a Web Page. Here is an example image of web page.
Example image for parts of web page.
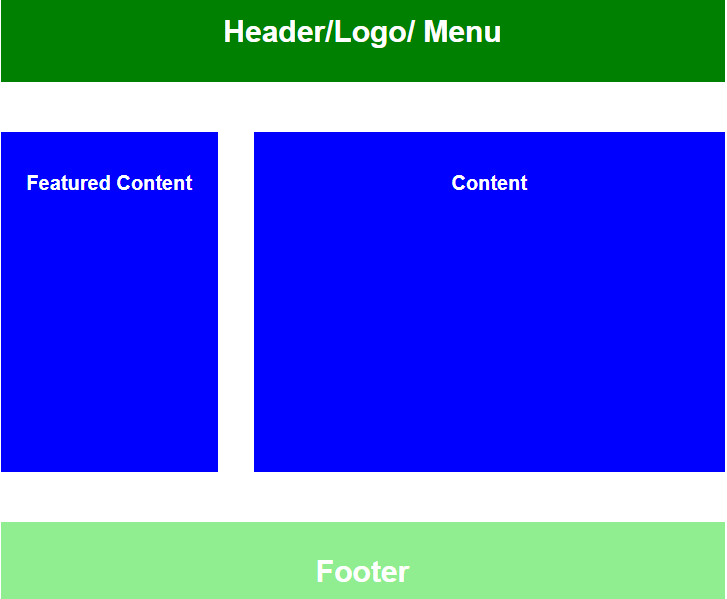
Here we describe main parts of web page.
Header
The header is the top part of your web page. It could contain the company logo, image, and navigation menu.
Body
The body of the web page contain the textual content, slider and other parts such as table if any and background colors Images etc.
Footer
The footer of the web page contain the contact information and other information like services if any. Now we are going to create directory for PSD to HTML web page.
Create directory for PSD to HTML
Example image for directory.
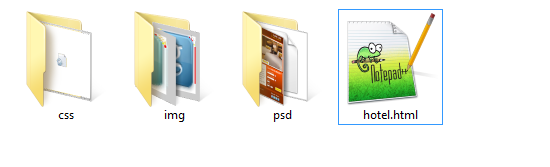
It is a good practice to create the required folders on your computer so you can proceed and mange it easily.
- Main folder with website name.
- Images where all the images that you need for your website should be stored.
- CSS for the styling of web page.
- PSD for the storing PSD file background color files that you have made using Photoshop.
Once you have created the required folders it is time to create your HTML page and we are going to create a web page of luxury hotel using HTML and CSS and below is the PSD file image and we create our HTML web page according to below PSD image file.
PSD Image file.
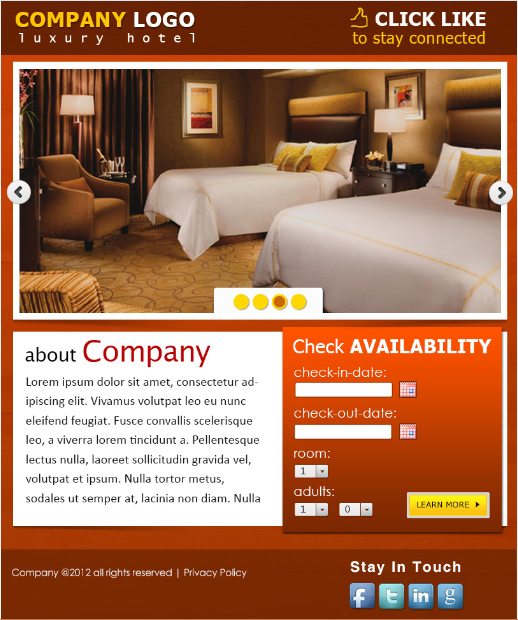
Building a structure of webpage keeping the above PSD in mind.
STEPS
We need to follow the following steps below to create our web page.
- Launch your text editor and create a new file and save it as "hotel.html" in your project folder.
- Write down the standard HTML5 tags used in defining a HTML document in "hotel.html" file. Example.
<html>
  <head>
    <title> Luxury Hotel</title>
  </head>
<body>

</body>
</html>
After writing the standard html tags we make header section between body tags according to PSD requirement and apply CSS style code by linking HTML web page with CSS hotelstyle.css sheet.
Here is structure of header section between body tags.
<html>
	<head>
		<title>Luxury Hotel</title>
		<!--below link is css style link -->
		<link rel="stylesheet" type="text/css" href="css/hotelstyle.css">
	</head>
	<body>
	<!--we have wrap our header section in a dive with class name wrapper -->
		<div class="wrapper">
			<div class="header">
				<div class="logo">
					<h1 class="company">COMPANY</h1>
					<h1 class="logoh1">LOGO</h1>
					<p class="luxuary">LUXURY HOTEL</p>
				</div>
				<div class="like">
					<img src="img/click.png">
					<h1>CLICK ME</h1>
					<p class="connected">TO STAY CONNECTED</P>
				</div>
			</div>

		</div>
	</body>
</html>
As you can see there is header section Inside a <div class="wrapper"> element which will be fixed width and center. Now let's add a little CSS for header section:
*{
	padding:0;
	margin:0;
}
/* start wrapper*/
.wrapper{
	width:60%;
	height:972px;
	background-image:url("../img/background.jpg");
	margin:0 auto;
}
/* end wrapper*/
/* start header*/
.header{
	width:100%;
	height:100px;
	background:#682202;
}
.logo{
	width:50%;
	position:relative;

}
.logo h1{
	    top: 23px;
}
.logo h1.company{
	position: absolute;
    float: left;
    color: #ffc600;
    font-family: "Tahoma Bold";
    font-size: 24pt;
    left: 23px;
}
.logo h1.logoh1{
	font-size: 24pt;
    float: left;
    color: white;
    position: absolute;
    left: 200px;
}
.logo p.luxuary{
	    font-size: 15pt;
    color: white;
    top: 56px;
    position: absolute;
    left: 23px;
    letter-spacing: 11px;

}
.like{
	position:relative;
}
.like img{
	position: absolute;
    right: 268px;
    top: 24px;
}
.like h1{
	position: absolute;
    right: 95px;
    top: 24px;
    color: white;
}
.like p{
	right: 95px;
	color: #ffc600;
    position: absolute;
    top: 56px;
    font-size: 20px;
}
/* end header*/
So we're setting the header section by adding background image and style using CSS.
Here is the image after apply CSS on header section.
Image for header section.

After creting a header section now we are going to create a slider section according to PSD between body tags but below the header section by adding div as we add in header section.
Here is HTML structure for slider section.
<div class="slider">
				<img src="img/slider.jpg">
				<div class="left-arrow">
					<img src="img/left.png">
				</div>
				<div class="right-arrow">
					<img src="img/right.png">
				</div>
				<div class="bullets">
					<ul>
						<li></li>
						<li></li>
						<li class="fixed"></li>
						<li></li>
					</ul>
				</div>
			</div>
As you can see there is slider section Inside a <div class="slider">element which will be fixed width and center. Now let's add a little CSS for slider section:
Here is css style code for slider section.
*{
	padding:0;
	margin:0;
}
/* slider start*/
.wrapper{
	width:60%;
	height:972px;
	background-image:url("../img/background.jpg");
	margin:0 auto;
}

.slider{
	position: relative;
	height:420px;
}
.slider img{
	position: absolute;
    border: 11px white solid;
    /* left: 16px; */
    /* top: 12px; */
    width: 93%;
    margin: 15px 17px;
}
.left-arrow img{
	    width: 4%;
    border: none;
    top: 178px;
    left: -6px;
}
.right-arrow img{
	    border: none;
    width: 4%;
    top: 178px;
    /* right: 5px; */
    float: right;
    left: 751px;
}
.bullets{

}
.bullets ul{
	position: absolute;
    bottom: 0px;
    left: 40%;
    top: 384px;
}
.bullets ul li{
	display: inline-block;
	width: 25px;
    background-color: #ffc600;
    height: 25px;
    border-radius: 50px;
}
.bullets ul li:hover{
	background-color:#ca6604;
	transition:2s;
}
.bullets ul li.fixed{
	background-color:#ca6604;
}
/* slider end*/
So we're setting the slider section by adding div which name is slider and give style using CSS.
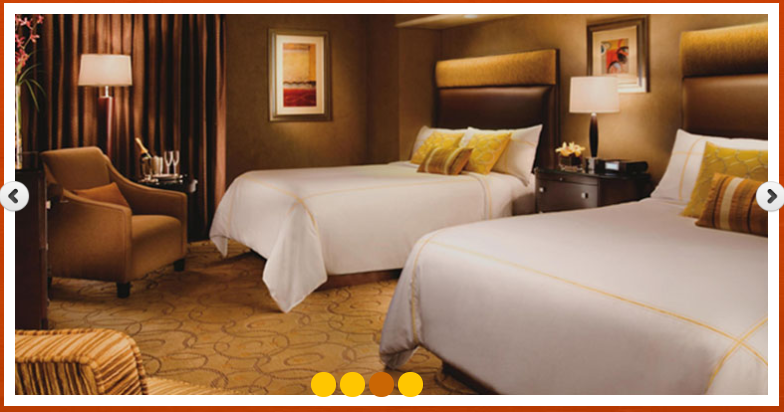
Here is the image after apply CSS on slider section.
Image for slider section.
After creating header and slider section we are going to create a content and footer section of web page according to PSD between body tags the content section contain 2 columns but below the slider section by adding div as we add in header section and in slider section.
Here is HTML structure for content and footer section.
<div class="about">
				<div class="about-company">
				<!-- about company -->
					<h2 class="about-p">about</h2>
					<h1>Company</h1>
<!-- content -->

					<p>Lorem ipsum dolor sit amet, consectetur adipiscing elit.
					Vivamus volutpat leo eu nunc eleifend feugiat.
					Fusce convallis scelerisque leo, a viverra lorem tincidunt a.
					Pellentesque lectus nulla, laoreet sollicitudin gravida vel,
					volutpat et ipsum. Nulla tortor metus, sodales ut semper at,
					lacinia non diam. Nulla </p>
<!—end content -->

				</div>
				<div class="check">
				<!-- background img for content -->
					<img src="img/bgred.png" class="bg">
					<h1>Check AVALABILITY</h1>
					<form>
						<label>Check in date:</label>
						<br>

						<input type="Start-date">
						<br>
						<br>
						<label>Check in date:</label>
						<br>
						<input type="End-date">
						<br>
						<br>
						<label>rooms</label>
						<br>
						<select class="select-rooms">
							<option>1</option>
							<option>2</option>
							<option>3</option>
							<option>4</option>
						</select>
						<br>
						<br>
						<label>adults</label>
						<br>
						<select class="adult">
							<option>1</option>
							<option>2</option>
							<option>3</option>
							<option>4</option>
						</select>
						<select class="adult-select">
							<option>1</option>
							<option>2</option>
							<option>3</option>
							<option>4</option>
						</select>
						<input type="button" class="button" value="Learn more" >
					</form>
					<img src="img/date.png" class="date1">
					<img src="img/date.png" class="date2">
				</div>
			</div>
			<!-- end content section -->
			<!-- start footer-->
			<div class="footer">
				<p>Company @2012 all rights reserved | Privacy Policy</p>
				<h1>Stay In Touch</h1>
				<ul>
					<li><img src="img/fb.png"></li>
					<li><img src="img/twitter.png"></li>
					<li><img src="img/linkedin.png"></li>
					<li><img src="img/google.png"></li>
				</ul>
			</div>
			<!-- end footer-->
As you can see there is content (about) section Inside a <div class="about"> and footer section inside a <div class="footer"> elements which will be fixed width and center. Now let's add a little CSS for content and about section:
Here is css code for styling of content (about) section and footer section.
*{
	padding:0;
	margin:0;
}
.wrapper{
	width:60%;
	height:972px;
	background-image:url("../img/background.jpg");
	margin:0 auto;
}
/* start content are about styling*/
.about{
	width: 96%;
    height: 305px;
    background-color: white;
    margin: 20 auto;
}
.about-company{
	position:relative;
	width:50%;
	height:inherit;
	float:left;
}
.about-p{
	position: absolute;
    top: 12px;
    left: 14px;
    font-size: 24px;
}
.about-company h1{
	position: absolute;
    top: 4px;
    left: 79px;
    color: #b80404;
}
.about-company p{
	position: absolute;
    top: 45px;
    align-content: center;
    text-align: justify;
    font-size: 20px;
    left: 13px;
}

.check{
	position:relative;
	width:50%;
	height:inherit;
	float:left;
}
.bg{
	position: absolute;
    /* bottom: -73px; */
    bottom: -15px;
    right: 5px;

}
.check h1{
	position: absolute;
    color: white;
    font-size: 28px;
    left: 69px;
    top: 6px;
}
.check form{
	position: absolute;
    top: 48px;
    left: 52px;
}
.check form label{
	color:white;
}
.check form select{
	    margin-left: 5px;
}
.check form select.adult-select{
	    margin-left: 8px;
}
.check form input.button{
	width: 129px;
    height: 39px;
    background-color: #fccb13;
    border: 3px #d4d4d4 solid;
    margin-left: 90px;
    /* margin-top: 1px; */
}
.date1{
	position: absolute;
    left: 230px;
    top: 62px;
}
.date2{
	position: absolute;
    left: 230px;
    top: 117px;
}
/* end content are about styling*/
/* start footer styling*/
.footer{
	width: 100%;
    height: 106px;
    background: #682202;
	position:relative;
}
.footer p{
	position: absolute;
    color: white;
    top: 30px;
    left: 21px;
}
.footer h1{
	position: absolute;
    right: 80px;
    color: white;
    top: 10px;
}
.footer ul{
	    position: absolute;
    top: 49px;
    right: 74px;
}
.footer ul li{
	    display: inline-block;
    margin-left: 3px;
}
/* end footer styling*/
So we're setting the content and footer sections by adding div which names is about and footer after applying style using CSS.
Here is the image after apply CSS on content and footer section.
Image for content section.
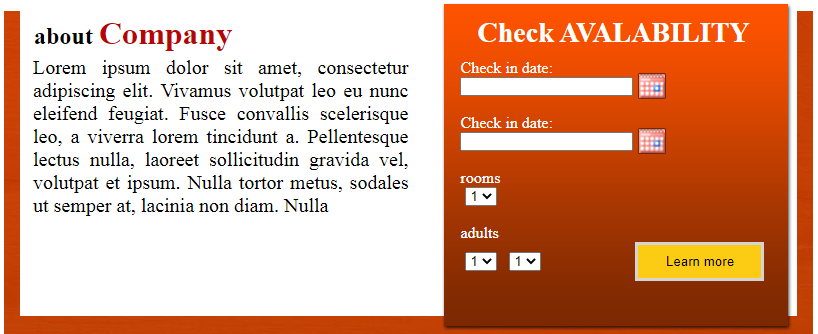
Image for footer section.

Now we are going to create complete html structure of PSD by adding all HTML code together. Below is complete HTML code.
<html>
	<head>
		<title>Hotel</title>
		<link rel="stylesheet" type="text/css" href="css/hotelstyle.css">
	</head>
	<body>
		<div class="wrapper">
			<div class="header">
				<div class="logo">
					<h1 class="company">COMPANY</h1>
					<h1 class="logoh1">LOGO</h1>
					<p class="luxuary">LUXURY HOTEL</p>
				</div>
				<div class="like">
					<img src="img/click.png">
					<h1>CLICK ME</h1>
					<p class="connected">TO STAY CONNECTED</P>
				</div>
			</div>
			<div class="slider">
				<img src="img/slider.jpg">
				<div class="left-arrow">
					<img src="img/left.png">
				</div>
				<div class="right-arrow">
					<img src="img/right.png">
				</div>
				<div class="bullets">
					<ul>
						<li></li>
						<li></li>
						<li class="fixed"></li>
						<li></li>
					</ul>
				</div>
			</div>
			<div class="about">
				<div class="about-company">
					<h2 class="about-p">about</h2>
					<h1>Company</h1>
					<p>Lorem ipsum dolor sit amet, consectetur adipiscing elit.
					Vivamus volutpat leo eu nunc eleifend feugiat.
					Fusce convallis scelerisque leo, a viverra lorem tincidunt a.
					Pellentesque lectus nulla, laoreet sollicitudin gravida vel,
					volutpat et ipsum. Nulla tortor metus, sodales ut semper at,
					lacinia non diam. Nulla </p>
				</div>
				<div class="check">
					<img src="img/bgred.png" class="bg">
					<h1>Check AVALABILITY</h1>
					<form>
						<label>Check in date:</label>
						<br>

						<input type="Start-date">
						<br>
						<br>
						<label>Check in date:</label>
						<br>
						<input type="End-date">
						<br>
						<br>
						<label>rooms</label>
						<br>
						<select class="select-rooms">
							<option>1</option>
							<option>2</option>
							<option>3</option>
							<option>4</option>
						</select>
						<br>
						<br>
						<label>adults</label>
						<br>
						<select class="adult">
							<option>1</option>
							<option>2</option>
							<option>3</option>
							<option>4</option>
						</select>
						<select class="adult-select">
							<option>1</option>
							<option>2</option>
							<option>3</option>
							<option>4</option>
						</select>
						<input type="button" class="button" value="Learn more" >
					</form>
					<img src="img/date.png" class="date1">
					<img src="img/date.png" class="date2">
				</div>
			</div>

			<div class="footer">
				<p>Company @2012 all rights reserved | Privacy Policy</p>
				<h1>Stay In Touch</h1>
				<ul>
					<li><img src="img/fb.png"></li>
					<li><img src="img/twitter.png"></li>
					<li><img src="img/linkedin.png"></li>
					<li><img src="img/google.png"></li>
				</ul>
			</div>
		</div>
	</body>
</html>
Now let’s add the CSS as follows:
All CSS should be added in the hotelstyle.css file.
*{
	padding:0;
	margin:0;
}
.wrapper{
	width:60%;
	height:972px;
	background-image:url("../img/background.jpg");
	margin:0 auto;
}
.header{
	width:100%;
	height:100px;
	background:#682202;
}
.logo{
	width:50%;
	position:relative;

}
.logo h1{
	    top: 23px;
}
.logo h1.company{
	position: absolute;
    float: left;
    color: #ffc600;
    font-family: "Tahoma Bold";
    font-size: 24pt;
    left: 23px;
}
.logo h1.logoh1{
	font-size: 24pt;
    float: left;
    color: white;
    position: absolute;
    left: 200px;
}
.logo p.luxuary{
	    font-size: 15pt;
    color: white;
    top: 56px;
    position: absolute;
    left: 23px;
    letter-spacing: 11px;

}
.like{
	position:relative;
}
.like img{
	position: absolute;
    right: 268px;
    top: 24px;
}
.like h1{
	position: absolute;
    right: 95px;
    top: 24px;
    color: white;
}
.like p{
	right: 95px;
	color: #ffc600;
    position: absolute;
    top: 56px;
    font-size: 20px;
}
.slider{
	position: relative;
	height:420px;
}
.slider img{
	position: absolute;
    border: 11px white solid;
    /* left: 16px; */
    /* top: 12px; */
    width: 93%;
    margin: 15px 17px;
}
.left-arrow img{
	    width: 4%;
    border: none;
    top: 178px;
    left: -6px;
}
.right-arrow img{
	    border: none;
    width: 4%;
    top: 178px;
    /* right: 5px; */
    float: right;
    left: 751px;
}
.bullets{

}
.bullets ul{
	position: absolute;
    bottom: 0px;
    left: 40%;
    top: 384px;
}
.bullets ul li{
	display: inline-block;
	width: 25px;
    background-color: #ffc600;
    height: 25px;
    border-radius: 50px;
}
.bullets ul li:hover{
	background-color:#ca6604;
	transition:2s;
}
.bullets ul li.fixed{
	background-color:#ca6604;
}
.about{
	width: 96%;
    height: 305px;
    background-color: white;
    margin: 20 auto;
}
.about-company{
	position:relative;
	width:50%;
	height:inherit;
	float:left;
}
.about-p{
	position: absolute;
    top: 12px;
    left: 14px;
    font-size: 24px;
}
.about-company h1{
	position: absolute;
    top: 4px;
    left: 79px;
    color: #b80404;
}
.about-company p{
	position: absolute;
    top: 45px;
    align-content: center;
    text-align: justify;
    font-size: 20px;
    left: 13px;
}

.check{
	position:relative;
	width:50%;
	height:inherit;
	float:left;
}
.bg{
	position: absolute;
    /* bottom: -73px; */
    bottom: -15px;
    right: 5px;

}
.check h1{
	position: absolute;
    color: white;
    font-size: 28px;
    left: 69px;
    top: 6px;
}
.check form{
	position: absolute;
    top: 48px;
    left: 52px;
}
.check form label{
	color:white;
}
.check form select{
	    margin-left: 5px;
}
.check form select.adult-select{
	    margin-left: 8px;
}
.check form input.button{
	width: 129px;
    height: 39px;
    background-color: #fccb13;
    border: 3px #d4d4d4 solid;
    margin-left: 90px;
    /* margin-top: 1px; */
}
.date1{
	position: absolute;
    left: 230px;
    top: 62px;
}
.date2{
	position: absolute;
    left: 230px;
    top: 117px;
}
.footer{
	width: 100%;
    height: 106px;
    background: #682202;
	position:relative;
}
.footer p{
	position: absolute;
    color: white;
    top: 30px;
    left: 21px;
}
.footer h1{
	position: absolute;
    right: 80px;
    color: white;
    top: 10px;
}
.footer ul{
	    position: absolute;
    top: 49px;
    right: 74px;
}
.footer ul li{
	    display: inline-block;
    margin-left: 3px;
}
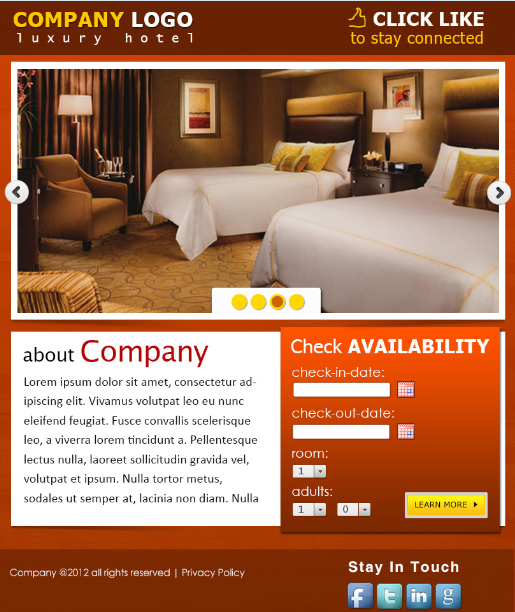
Here is the final image of the overall markup that we have done. Now our layout should look like this.
Final Output image.
We hope you may learn how to convert PSD into HTML. Please share your thoughts in the comment section below or contact us.